As a culmination to this course, I have designed a midterm (final, actually) project that will test your ability to use a digital camera in several ways that extend beyond what can be accomplished by simply using the "auto" or "program" settings.
If you require assistance with your personal camera using the camera in manual mode, bring it in and I will help you with this.
So here it goes...
If you require assistance with your personal camera using the camera in manual mode, bring it in and I will help you with this.
So here it goes...
1. Create a photograph that simultaneously demonstrates motion blur and freeze:

Example of blurred background with subject in focus
There are two techniques that can help you to do this. The first is creating a blurred background with subject in focus. This technique keeps your photograph’s subject in sharp focus while the background is blurred. Using our train example, the train would be blurred and the girl on the subway platform would be in sharp focus, thereby conveying the train’s movement. To do this, you need to use a slow shutter speed. You'll also need to either use a tripod, or brace your camera on a secure, non-moving object. A shutter speed slower than 1/8 second will usually result in a moving background blurring, depending on the speed it is moving. Beside trains, moving backgrounds could include cars, crowds of walking people, bicycles, people playing sports, etc. Be creative, and don't rely on simply photographing in the hallways of the school...we're all stocked up with those.

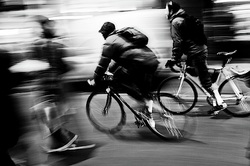
The panning technique results in a sharp subject
The second way to do this is called panning. Most beginning photographers are trained to hold their cameras as still as possible. That works for most types of photographs, but not all. By contrast, panning requires that you move your camera with your subject. Specifically, you’ll be matching your subject’s rate of movement and the direction in which it is traveling. In the example to the left, assume the man on the bike is moving from east to west. In this case, you’ll need to pan your camera along the same direction, matching the speed of the bike. The best results occur when you have a clear view of the moving object and ample room to swivel your camera along a parallel axis to it. Panning effectively can be difficult. You can practice and perfect your technique by photographing things that move quickly. It will take some time to get it right, but will result in a great photograph.
2. Create two identical photographs that demonstrate great and shallow depth of field:

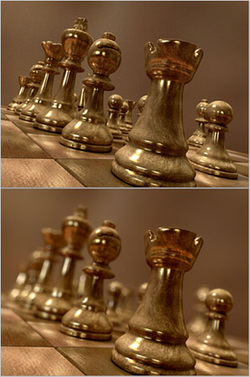
Examples of great and shallow depth of field
Controlling depth of field is one of the simplest, yet effective ways to create strong emphasis on the subject of your photographs. Great depth of field yields a sharp image from the nearest foreground to the furthest background. Shallow depth of field results in a very narrow "slice" of the image in focus. Depth of field is controlled by aperture. A large aperture (f 2, f 2.8, f 4) renders shallow depth, and a small aperture
(f 16, f 22) gives great depth. See the example to the right, noticing that the chess pieces in the top image are all in focus (great depth, small aperture), while the bottom photograph's pieces fall out of focus rapidly
(shallow depth, large aperture) as they fall further into the background.
The available apertures on many cameras include:
(shallow dof) (medium dof) (great dof)
f2 f2.8 f4 f5.6 f8 f11 f16 f22 f32
3. Create a photograph that demonstrates a technique that you explore yourself:

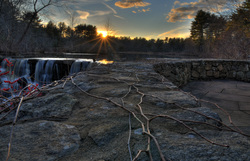
Example of HDR (high dynamic range) photography
Explore a tutorial online that demonstrates a technique that you haven't tried before. Some examples: tilt-shift miniatures, high dynamic range, light graffiti, morphing similar objects, etc. Create a photograph that represents the style of that technique. Ask me lots of questions about the technique, and I will be happy to work through the processes involved with you.
When you have completed this project, please post it on your website. It should be placed on a new page called "Midterm Project", and all images should be expandable to full-size. The midterm grade is calculated through your level of success in completing the project, both technically and creatively, (all projects, however technical, also need to be good photographs), as well as your success in skillfully* posting it to your site.
*Skillful website design is the clean, simple, and deliberate placement of images in an easily navigable format with the least amount of distracting elements possible. Please ask me about this if you are not sure about your website design.
*Skillful website design is the clean, simple, and deliberate placement of images in an easily navigable format with the least amount of distracting elements possible. Please ask me about this if you are not sure about your website design.
